Reference
For more information about supply chain configuration, see "Edit - Program - Supply Chain Config (v2.8)".
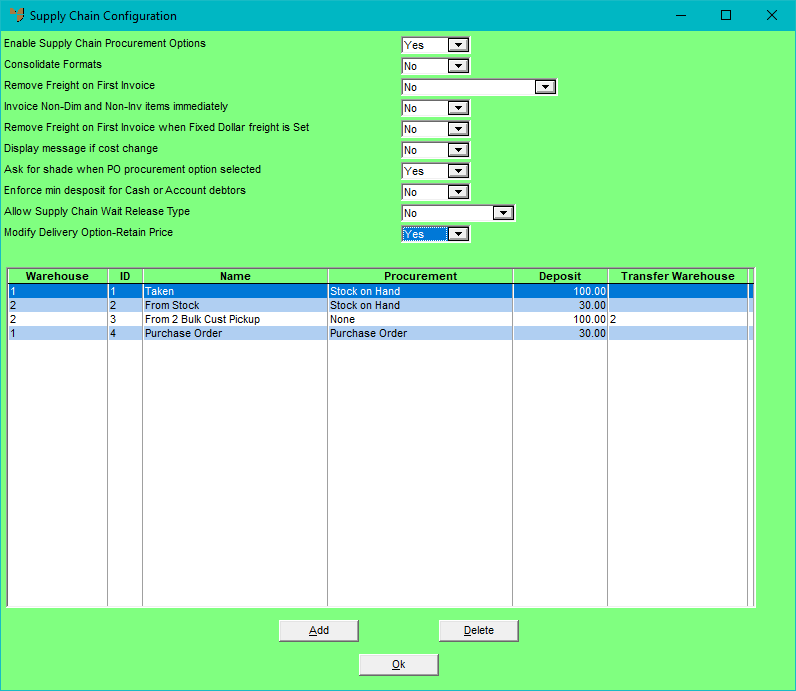
You use the Supply Chain Configuration screen to set up the supply chain procurement and delivery options that users can select from when processing invoices in Micronet.
|
|
|
Reference For more information about supply chain configuration, see "Edit - Program - Supply Chain Config (v2.8)". |
Refer to "Selecting a Company to Edit"
Micronet displays the Supply Chain Configuration screen.
|
|
Field |
Value |
|---|---|---|
|
|
Enable Supply Chain Procurement Options |
Select Yes to enable supply chain procurement throughout Micronet, or select No if your company does not use supply chain procurement. The main effect of turning this option on is that the Enter Invoice Line screen in Invoice Creation has separate tabs for general item details and procurement options. For more information, see "Entering Invoice Lines - Supply Chain (v2.8)". When this option is turned off, the standard Enter Invoice Line screen is displayed during Invoice Creation – see "Entering Invoice Lines - Standard". |
|
|
Consolidate Formats |
When a customer takes some items on an order but has others still to be ordered or delivered, Micronet can produce an invoice for the items taken and an order confirmation for the remaining items. If you select Yes in this field, Micronet will consolidate the two documents, producing one order confirmation that lists the items invoiced and taken as well as the items still on order. Select No if you want invoices and order confirmations printed separately. |
|
|
Remove Freight on First Invoice |
Select how you want freight to be treated when there is more than one invoice for a supply chain order (e.g. the original delivery then backorders):
|
|
|
Invoice Non-Dim and Non-Inv Items Immediately |
Select Yes if you want non-inventory / non-diminishing items invoiced immediately. If you only want non-diminishing/ non-inventory items to be invoiced when other items are also to be supplied, select No. However, if an invoice contains only a non-diminishing or non-inventory item, it will be invoiced immediately. |
|
|
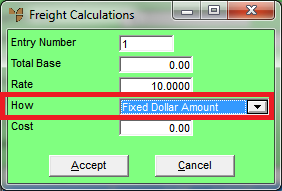
Remove Freight on First Invoice when Fixed Dollar Freight is Set |
Similar to the Remove Freight on First Invoice field, set this field to Yes if you want freight to be charged only once per supply chain invoice. However, this only applies where the freight code on an invoice is set to Fixed Dollar Amount – see "Freight - Main".
|
|
|
Display message if cost change |
Select Yes if you want a message displayed on the Enter Invoice Line screen - General tab when the cost price of an item has risen since the last time a specific product was sold to a customer. The message is only displayed if:
|
|
|
Ask for shade when PO procurement option selected |
Select Yes if you want users to be prompted to enter a specific tile shade when adding a FIFO item to an invoice that has serial number tracking enabled, and where the Procurement Option is set to either Purchase Order or automatic purchasing. This displays the Specify Shade Required screen where users can either enter a serial number or select a serial number from a list – see "Enter Invoice Line - Procurement (v2.8)". The serial number is then added as a text line to the supply chain order and the purchase order. |
|
|
Enforce min deposit for Cash or Account debtors |
Select Yes if you want Micronet to calculate and display the Min Amount Required on the Order Payment screen when processing supply chain orders for debtors who are either Cash or Cash or Account – see "Processing Cash Payments - Supply Chain (v2.8)". Note that this minimum deposit can still be overridden if the Can Override Deposit Amount field on the user's POS Security settings is set to Yes – see "Maintenance - Edit UserIDs - 6. POS Security". |
|
|
Allow Supply Chain Wait Release Type |
Select whether your company allows wait/release orders where sales orders are entered into Micronet well before the customer actually needs the goods, and then released to the customer at the appropriate time. The options are:
For more information, see "Wait/Release Orders". |
|
|
Modify Delivery Option-Retain Price |
Set this field to Yes if you want Micronet to retain the original sell price on a supply chain order line when any of the following details are changed:
If you want the sell price recalculated and updated when these details are changed, select No. |
If you selected to add, insert or edit a procurement option, Micronet displays the Delivery Options screen.

|
|
Field |
Value |
|---|---|---|
|
|
Warehouse |
Enter the ID of the warehouse that this procurement option applies to. You can press Tab or Enter to select a warehouse. All procurement options must be entered against a warehouse. The procurement options you setup are displayed to staff in that warehouse when they are processing sales orders. |
|
|
ID |
Enter a unique number for this procurement option. This determines the order in which Micronet will source items during sales order processing. The lowest number (e.g. 1) will be the first source of stock and, if unavailable, Micronet will keep going down the procurement options in priority order until it finds an appropriate source. For example, stock on hand would normally be set to 1 as the highest priority procurement option. If there is not enough stock on hand of an item for a customer order, the next priority might be to request a stock transfer from a central distribution centre, then request a stock transfer from another branch, then send an automatic purchase order request to the supplier. The procurement options and priority order can be completely tailored to meet your company's structure and requirements. |
|
|
Procurement Name |
Enter a name for this procurement option. This name will be displayed to users as an option they can select when procuring an item in Invoice Creation. |
|
|
Procurement Type |
Select the procurement type for this option. Options are:
|
|
|
Deposit % |
Enter the deposit required from the customer when this procurement option is selected. Note that this can be overridden if a Minimum Deposit % is entered on the product category – see "File - Product Category - Category". |
|
Transfer Warehouse |
If you selected HO Branch Transfer in the previous field, enter the ID of the head office (or central distribution warehouse) for the warehouse this procurement option applies to. You can also press spacebar then Enter to select a warehouse. |
|
|
Default Delivery |
Select the default customer delivery type for the procurement option. Options are:
Users can override the delivery type when processing sales orders if required. |
|
|
|
Technical Tip Note that the priority on a procurement type (i.e. the ID) and the Default Delivery option can be overridden by the following settings on the debtor and the user.
If these fields are not set on the debtor, Micronet will use the user settings. If they are not set on the user, it will use the company settings. |
Micronet redisplays the new or updated procurement option on the Supply Chain Configuration screen.
Micronet redisplays the Change Existing Company screen.
Refer to "Logging in With Updated Configuration (Method 1)" or "Logging In With Updated Configuration (Method 2)".